Share
Pin
Tweet
Send
Share
Send
For a small workshop, they usually take ready-made compressors based on the number of equipment involved, and the average intensity of its use. Having calculated the consumed volume of air, it is possible to calculate the capacity of the compressor unit.
Our today's homemade product is a little, much full-fledged compressor. Of course, it is unlikely that it will replace the main compressor unit, but as an additional portable device it will work fine. Later we will see what she is capable of. So here we go!
Short description and principle of operation
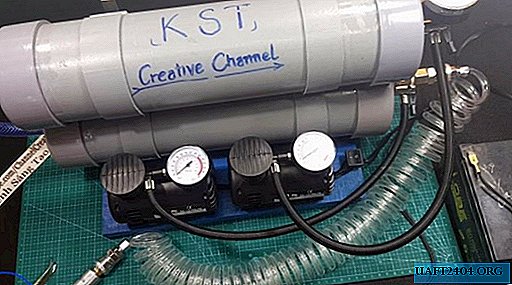
At first glance, it seems that this is something frivolous, because plastic pipes do not withstand high pressure. In fact, it will not be. According to the warning of the author of the homemade product, the safe working pressure should not exceed 3 bar or atmospheres. Two electric oil-free piston type compressors are complemented by two receivers of closed plastic pipes interconnected. At the end of one of the receivers there is an outlet for a quick-detachable adapter for an elastic air hose. The unit is designed for 12V power from the battery. Manual shutdown forced.
We select the necessary materials and tools
The material base for this device is as follows:
- PVC pipe with a diameter of 110 mm;
- Four external PVC caps for receivers;
- Standard compressor pressure gauge;
- Oxygen hoses;
- Spiral hose with quick coupling;
- Compressor fitting - 2 pcs;
- The nipple from the old bicycle chamber - 2 pcs;
- Ball valve with transition to quick-detachable connection;
- Automotive compressor for tire inflation on 12V - 2pcs;
- A section of a board for a bed;
- Several strips of metal for racks for receivers;
- 2 or 4-pin button switch;
- Fum tape, glue for PVC, heat shrink tubes;
- Hardware: clamps, bolts, nuts, self-tapping screws, washers;
- Spray gun with spare nozzle for checking the machine.


The assembly toolkit will need the following:
- Screwdriver or drill;
- Calipers
- Scissors or a paint knife;
- Set of open-end wrenches;
- A set of drills, 12mm pen drill;
- Screwdriver, pliers, wire cutters, metal scissors;
- Soldering iron with flux and solder;
- Tape measure, marker, hacksaw.
Getting to work
We take a PVC pipe with a diameter of 110 mm, and marking it, cut two pieces of 40 cm each. These will be our receivers.


Next, we prepare the stubs. In total we have four of them.

We equip two of them with nipples for direct connection to compressors. We cut them in advance from old bicycle chambers. This procedure is easiest to make with scissors.


We select a drill approximately for the diameter of the barrel of the nipple. Drill through holes with a screwdriver or drill. We insert the nipples into the holes, and tighten the nut through the soft gasket from the outside to the plug.


We take our manometer, and wrap the threaded connection with fum tape. We fix it in one of our "nipple" plugs, displacing the landing hole from the center to the edge. The hole for it must be made with a 12mm pen drill. We squeeze it through a makeshift rubber gasket, which we cut out from the remains of the bicycle chamber.


In the next two plugs in the center we mount the nozzle. Having wrapped a threaded connection with a fum tape, we push the fitting into the holes. Fasten the fitting on the back of the plug with a nut. The rubber gasket should be laid with a wide washer and tighten the connection with an open-end wrench.


The installation of a ball valve closes the work with plastic plugs. It is necessary in order to restrain the pressure of constantly incoming air pumped by compressors, and to supply it as necessary. We select its outer size for the inner diameter of the quick-detachable adapter for the hose. We place the crane on the cap with a nipple. We shift the hole under it from the center, and drill with a pen drill.


We seal the tap with a fum tape and mount it in the cap, laying it with a rubber homemade gasket. You can check the serviceability of the crane by turning the lamb all the way.


We glue the plugs to the pipes of our receivers in the following order: nipple on one end, and nipple on the other. Pressure gauge with tap should be on one side. We use glue for PVC products like Tangit or Mars. Remove excess glue with a rag.


Making a stand
After we made the receivers, it is necessary to fix them stable on the base. The easiest way to do this is to take a piece of the board with a width of at least 25 cm, and of sufficient length to fit two compressors. You can additionally paint it on the front side, protecting it from moisture, as the author of the homemade product did.


Installation of receivers and connection of compressors
The next step is the manufacture and fastening of metal stand plates for PVC pipes. We bend them as shown in the photo, and fix them on a wooden stand with screws. We install cuffs on the bolts, which we make from the same pipe, cutting its wall.


We place our receivers in cuffs and connect the fittings with oxygen hoses. We fix the connections with the fittings to the clamps.


We try on compressors at the installation site. You must make sure that they fit freely on the stand and do not interfere with each other. We disassemble them in order to connect in parallel. Solder the contacts with a soldering iron. We use for this a native cable from compressors.


We assemble the compressors again, and fix them on the frame using self-tapping screws. To reduce the vibration from their work, you can additionally glue their bodies with double tape.


To pull the two cables from the compressors together, you can cut the shrink cambrices on the advice of the author and warm them with a lighter.

The switch button is displayed on the side of the compressors, closer to the nipple connections. We solder the contacts, and glue the button to the stand on hot glue.


Checking the health of the unit
After all the connections are completed, you can connect both compressors with their regular hoses to the nipple connectors. By connecting the battery to 12V, we can carry out a test run and check the operation of our prefabricated device using a manometer. Do not forget to close the ball valve before this. We insert a spiral hose with a spray gun through a quick-detachable connector, and enjoy the work of a home-made compressor unit. Good luck to all the self-made!


Practical tips
Do not forget about basic safety precautions when working with even such a compressor unit. It is necessary to constantly monitor the permitted pressure, preventing excess, otherwise the receivers may simply break. In this assembly, the electrical circuit provides for this only in manual mode.
All connections, threaded or adhesive, must also be carefully checked for leaks. Any air poisoning, especially from the end caps, can lead to a violation of the adhesion of the adhesive joint and its subsequent depressurization.
Since the housings of all elements - compressors and receivers - are plastic, avoid impact shocks so as not to disrupt the integrity of fragile plastic.
Choose PVC pipes as thick as possible, as their service life will be longer.


Despite the fact that such equipment does not claim to be prof. tool, it can be used for applying paints or varnishes with a spray. To dedust a workplace without wasting the power of a conventional compressor can also be done. And for airbrushing, such a device will probably be more convenient than a bulky full-time compressor. It weighs a little, so for field conditions this is the most suitable equipment. In any case, she deserves the title of technical home-made, and will be able to help out in the absence of the main tool.
Watch the video
Share
Pin
Tweet
Send
Share
Send

